Sunday 21 October 2012

Iron Man, The HUD- Case Study

Iron Man (2008) is a Marvel superhero based film directed by Jon Favreau. It stars Robert Downey, Jr. as Tony Stark. John Nelon was the visual effects supervisor on this film. He Delt specific tasks to different companies around the world. ILM, created the majority of VFX, The Orphanage created some of the smaller shots and  The Embassy created the the crude Mark 1 suit sequence.


Kent Seki, from Pixel Liberation Front, was the Visualisation/ HUD Effects Supervisor in Iron Man. The HUD design was influenced by the Dave's helmet in 2001: Space Odyssey(1968).
Space Odyssey Helmet

Artists rendition 


Story board artists drew shots of Tony Stark inside his mask. The depth in-between the graphics inside the Ironman mask allowed Robert Downey Jr. to preform with his face and eyes. This created a believable control panel.  Every single widget in the helmet has been thought about, each one has to be intuitive. Every panel activated from a collapsed mechanism to a large widget which moves forward in Z space.

3 things that had to happen:-

- The actors performance had to drive the action of the HUD.
- The Z depth had to be believable, so widgets appeared in the direction the actor was looking.
- Each shot had to have an alpha event, so a 'targeting shot' could be distinguished from a  'horizon lock shot'.

The approach to design the different HUDs:-

Ironmonger HUD- the design Stark Industries would release to the military, vector style graphics, aggressive, mean and primitive.


Tonys' HUD- Slick Technology, reflects his personality. Colour was an important factor here; in the 80's amber was hi-tech, in the 90's it was more blue/ cyan. Through out the film his helmet HUD shows progression, so the Widgets change colour from when he is 'scanning' to when he is 'flying' but in the Mark 3 (Final Suit) everything is uniform.


The white interface is clean and simple which makes the HUD look more advanced, animators used colour to pop up widgets for attention such as 'low power' or 'target'.


In the Mark 2, there are many different Widgets for each control. But in the Mark 3, The Orphanage animators created an omega widget. This would be a simple compus style graphic with little information around the sides, but when Tony looks at it, a lot more information  pops out as the graphic evolves from its rest state.

I have to admit, I did not pick up on a lot of the changes that happen to the HUD until l saw the 'making of' documentary. But its almost one of those subtle effects which gives a little more impact and believability to the film.
 The fact that the widgets are driven by the actor definitely create believable technology. I have seen on-line tutorials trying to copy this effect. They have not looked at the small details of evolving  graphics to show more or less information depending on what else is happening in the scene. I believe it is these small things which add seamlessness and believability to the HUD.

Information retrieved from link:
http://www.youtube.com/watch?v=WUBXmEWudnA&feature=channel&list=UL

Tuesday 16 October 2012

Star Wars Ep 1: The Pod Race Case Study


George Lucas: ‘The secret to film is that it’s an illusion… created 24 frames per second. You have the illusion of movement… space and time'.


One shot of ‘The Phantom Menace’ usually took the talent of 40/50 people to create. Digital technology allowed more freedom to build epic landscapes and speed-up the production process. Usually big films have about 250 VFX shots, Titanic (1997) had 450/500… Star Wars: Ep1 has 1700/ 2000. Models were built for up to 5 weeks, and destroyed for an explosion shot. The story is a mix between performance, subtlety, behaviour and pacing. Each shot is designed like a painting, but it is the quality of the VFX which need to be at a high standard, across the board. Also Sound is important!- helps build fines the visual.

The best compliment any VFX artist can receive is that no one knew there were any effects in the film.


George Lucas: ‘How can we manage to change the operating procedures in a way that we can completely revolutionise the way we make movies?’


I remember watching this on VHS when I was young and being amazed by just the idea of the pod race. I was never into racing games or even a fan of Star Wars at the time, but this race was just amazing. I watch it now and I'm still amazed at how well ILM have combined the use of CGI characters, matte painting, live action, miniatures, SFX and even hand puppets to create such a believable environment. I really like this sequence because you can almost disconnect it from the rest of the film and still understand what’s happening. Yes, it is the classic ‘underdogs unbelievable win’, that is often found in American cinema but the action is lively. It has a fast paced edit and occasional funny parts to compliment the action. It draws you in and makes you forget that it’s all effects. Small details have been taken into consideration which normally you wouldn't notice. The drivers, characteristics individualise their pods. Close up shots actually show the engines powering up. Parts on the machinery move showing how much power and force they carry. And throughout all this I'm still trying to figure out what is CGI, and what is a miniature model.


Terrain and backgrounds also fit the atmosphere. The area is like a desert so there is dust/sand which covers distant objects and just to add that extra bit of oomph, the camera shakes as the pods get close. Not forgetting that sound of Sebulbas giant orange pod engines. Then come the crashes, each individually manufactured, so the miniature engine catches fire but in the next scene it’s a duplicate CGI engine rolling on the ground as chunks break off, and you couldn't tell the difference until you were told. One of my favourite things that add to the realism is the fact that the pods are flexible when they turn corners. I mean, we know that the driver’s seat is held on by two cables but the animators have paid close attention to how the pod turns through the rocky terrain, so the engines turn first and the seat drags behind.


Speed, smoke, shadow and reflection are given importance, especially during shots from a distance. These are just small things which help build the picture up and make it believable. There are certain areas where pods are blurred more as they approach the camera and as they get further away. I quite like this idea, as oppose to blurring the whole thing to show speed, it gives the viewer a good chance to see which pod has gone past, perhaps also the emotion of the character on board.


*     *     *

The Fast and The Furious

I am able to see similarities between the pod race and other race films; Camera shakes, moving parts on machinery, added fire, smoke and sparks and driver’s reactions (which are similar to the way the cables on the pods in Star Wars move). Miniatures are not used as everything is digitalised. These, sometimes subtle additions keep the viewer’s sense of realism blurred so that he/she accepts the obvious CGI effects.


*     *     *


ILM (Industrial Light & Magic) is a subsidiary of George Lucas’ film production company, Lucas Film. It was put together when Lucas began producing the Star Wars film series. Using many technical and creative innovations, ILM has helped drive the evolution of visual effects. This involves blue-screen photography, matte painting and miniature models, developing motion control cameras, optical compositing and other advances in effects tech. ILM is a leading company in the use of computer graphics and digital imaging in feature films since 1980. They developed techniques such as digital compositing, morphing, simulations, Imocap and the EXR file format.

Friday 12 October 2012

First Digital 3D Rendered Film


In 1972 Ed Catmull (the founder of Pixar) and Fred Parke created the first ever digital 3D rendered film. This was a monumental breakthrough for film makers and animators everywhere. It was a 3D render of Ed’s left hand, and was later used in a feature film called Futureworld (1976). The video also shows the ‘behind the scenes’, which is incredible. From mapping to texturing and shading, it makes one think of what we digital animators take for granted.


Thursday 11 October 2012

Hotspots in the History of Effects


During 1920’s Hollywood was leading the way when it came to producing films ‘but the special effects of German film makers, combining their technical flair with their traditional love of fairy tales, were far superior.’ pg21.

‘Dorothy Vernon of Haddon Hall’ (1924)- the lower part of the castle was made as a full set, the upper part was a miniature and placed closer to the camera, so that it looked right through the lens.
‘The Rain comes’ (1939)- used multiple SFX and VFX techniques including split screen and miniatures to show floods and earthquakes. They won an early academy award for this work.

Around 1933, a new challenge of sound effects was brought to film makers as they were used to filming in studios. Somehow exotic locations had to find their way to the set, the rear projection method was born.
Rear Projection- ‘a process enabling background scenery to be projected onto a screen behind actors while filming in the studio’.

Optical Printing/Compositing- The process of combining 4 celluloid. A foreground image and its matte (male matte) with a Background plate and its matte (female matte). These are composited onto a clean film using an optical printer.

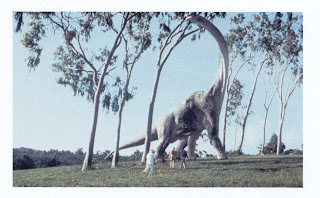
By the 1990’s CGI had become faster and easier to create but optical printing/celluloid still had to be used for the final film. From 1992 onwards film footage was convertible into a digital medium, manipulated using software and recorded back into film cells for the final exhibition. This method is used in Spielbergs’ Jurassic Park (1993).
When the Millennium came around Effects houses were top of their game, with each film exploring new depths and techniques as seen in Star Wars, Matrix and Lord of the Rings. Scenes of epic destruction brought super her movies to life.

Tent-pole Feature Film- a production with extravagant SFX and big name stars which cost about $120 million to make and give studios deeper pockets.
‘In previous years the job of providing visual effects for a movie was typically awarded to a single vendor- with possibly one or two others supplying additional specialised services. Today’s schedules mean that it is only possible for the largest of facilities to create all the effects for a major film’ pg 44
Visual effects are now tendered out on a shot-by-shot basis to studios known for their experience in particular areas. Harry Potter and the Goblet of Fire employed 10 companies to create its VFX.

Big Effects House- Big name studios that employ 100s of artists, possess vast computing networks and resources to research and develop new technology. Awarded for creating some of the most difficult and expensive effects shots, including character and complex environment. Houses such as; ILM, Digital Domain, Double Negative, Rythem and Hues and Sony Pictures imageworks.

Medium Effects House- Employing 50-100 artists, they use original research but usually off the shelf tech. to produce sophisticated shots for major productions and all shots for small productions.

Boutique Effects House- Employ about a dozen artists using a few modest computer work stations. They may be hired to produce one or two stand-alone shots for a feature film. Matte painting or mundane and less visible effects (wire removal).

VFX has become a significant part of marketing in any major movie as effect vendors are asked to complete their work quickly for trailers, internet sneak previews and demo their techniques as part of the DVD bonus features. These days the question is how fast can the effects be produced, with companies being sourced out to Korea and India.


Sodium Vapour Process- A camera which can hold 2 films is used (standard colour stock for the foreground and Monochrome stock for the matte). The studio is set with a florescent yellow screen which is illuminated with Sodium Vapour lamps. The foreground actor stands in front and is lit separately using normal lights with a Didymium filter (to absorb the yellow light). The camera has a prism inside which created 2 images simultaneously; 1-The actor with a black background, 2-A male matte with a monochrome silhouette of the actor These two are composited to over lay the actor onto a background. This was the most popular process used before digital matting, as seen in Disney’s Mary Poppins (1964).


Blue Screen Colour Difference Process- This method was more advanced than the Sodium Vapour Process because the blue backdrop was lit from behind. It could be made into a negative to create a matte. The RGB colour channels could be extracted from the original to better colour correct and remove the dark line around the foreground previously seen in the Sodium Vapour Process.

Optical Compositing- Optical printers were used to create visual tricks by compositing multiple shots using two film reels, each layered one above the other. A projector is used to print them to a new film using their mattes. This process was time consuming and difficult to get right, especially when there are multiple foreground objects to composite into the shot. Richard Edlund, effects supervisor for ILM, who worked on ‘The Empire Strikes Back’ (1980) created a 4 headed optical printer (The Quad). Using double the amount projectors and a prism to composite over 100 moving elements in ‘Star Wars- Return of the Jedi’ (1983).


Difference Matting- this is when two versions of the same scene are filmed. One containing the element that needs to be isolated and the other without. Software is the used to produce a matte based on the two changes. 


Digital Image Manipulation

Since digital images are no more than an abstract collection of numbers, they can be subjected to limitless manipulation. But when compositing the artist has to be clear about film stock, lighting, lens and exposure level because the human eye can pick up on uneven contrast, particularly in dark areas.

Shadow- Contrast is checked by comparing shadows, if one object has dense black and the other is grey, they need to be equalised. Even for CGI, a correct shadow pass allows the human eye to ‘assess the spatial relationship between objects’ pg 106

Focus- When filming with a DSLR camera, the mid ground object is usually in focus. To create a believable depth of field, FG or BG objects can be blurred in Post. This may cause grain, which must be removed to create a seamless image. This is called ‘grain management’. Note: the majority of grain is usually found in the blue channel.

Lens Distortion- Some cameras when capturing images, create a very slight curve on the edges. So VFX supervisors may sometimes straighten up all the images to match a grid, composite all the parts together and then re-warp the final composite to the previous natural edge curve. Note: the amount camera curves its edges can be found on the camera itself or its manual. Usually the camera filming the actors is used to determine the amount of warp used.


Motion Tracking- With modern software, pixels can be tracked for rotation, separation and scale. This method can be used to add objects into the scene or cover up items without key framing.

Digital painting- Using a range of erasing, blurring and cloning tools, objects and reflections can be removed from the BG in Post. Star Wars’ C3PO is made of glossy metal. ‘Many hours were spent painting out the blue/green that was reflected in the fuzzy droids shiny metalwork’. Pg108

Replication- The art of repeating an object by taking multiple shots of the same thing in different places and compositing it together. Note: when it comes to large crowds it is better to swap actors and wardrobe.

Warping- These can vary from reflections in a window which would be transparent and curved or background through fire heat which appears distorted.

Morphing- A powerful but subtle tool usually used to switch from a miniature to a full scale version of the same object. It can also be used to change the face of a stunt man to the actor. This is a highly technical effect where the programme uses curves to morph from one shot to the other in a select amount of frames.


Book Used for this Research: Special Effects: The History and Technique by Richard Rickitt

Wednesday 10 October 2012

Canterbury Anifest 2012


I had a fantastic time going down to Canterbury for the first time. I volunteered to help so I go in for free (because I'm cheap like that :D ). I got to work the lights in the main hall all day, which ment that I got to see all the talks! So all in all a good day! I especially went to see the talk by 'Double Negative' but I also really enjoyed 'Aardman'.


Eamonn Butler came down from De-Neg. He oversees the development of the studios Creature Animation Dept. He has worked on Hellboy 2, Paul and most recently on John Carter. Double negative has worked on other titles from Harry Potter to Inception. I found his talk really helpful as a window into the professional work of Effects Houses. He spoke about using different techniques to create the illusion that actors were riding on CGI 8 legged creatures. The actor would ride on a saddle mounted on top of  specially designed expensive vehicles (although it kind of just looked like a small car stripped to its bones). then the BG was filmed on its own and the vehicles were painted out so that CGI characters could be composited in. This task  seems more difficult to create than it is to explain, because the animators would have to match the exact movement of the rider on the saddle with the creature under it. The creature has to be shown taking the weight of the rider, these subtle notions of physics is what sells the shot. After the talk I got the opportunity to talk to him about what I should show to Double Negative in my show reel, specially for background, scenery and terrain. He said: 'As long as you can set a mood in your work, we can teach you the rest'. So this tells me that I don't particularly need to be the best at modelling, as long as I can show that I work well, combining live action with CGI and can create the correct mood in the shot, It will better my show reel.


Even though I'm not studying stop motion I took an interest in Aardman's talk. According to my research into the history of Effects work, before CGI the Optical effects were created with a combination of camera placement and miniature sets. Creatures were captured using the same technique used in stop motion, and later manually composited into the film by exposing the stop motion and live action together.


Jim Parkyn and Will Beacher came to talk about Ardman's latest film, 'Pirates! In an adventure with Scientists'. Jim has lead model making teams, and worked on Chicken Run, Shaun the Sheep as well as Pirates! Will joined as a trainee animator but is now a lead animator  who has worked on Wallace an Gromit: Curse of the Were-Rabbit and developed the Pirate Captain as well as directing three short animated films. They discussed how they used their many techniques to animate the characters, especially in crowd scenes, where stationary BG characters were simple clay models. To get a feel for mouth movements, they created CGI versions of the models head and manipulated the lips/jaw to create believable speech. The point that really fascinated me was the fact that their set for 'Blood Island' took up about half the space in the hall.


I really liked the design for this set as I watched the film because each shop  or building was named to co-exist in the pirates world. These were almost like side gags and I could see how traits cross over from Compositing believable BGs to building stop motion sets. The attention the detail at first seemed unnecessary to me because I thought, if something is going to be blurred out, in the distance or be panned across quickly, it shouldn't matter whether it looks right or not, because the audience wont remember it. But in professional practice and in my research I see that it is in fact these little immaturities that break the illusion of the shot.


They also mentioned that they used to fix the crack between the jaw and head of the character by adding clay, but found that it was much easier to fix in post production. This work falls into the category of visual effects, which means that I can show my skills of attention to detail, when compositing in Post off to a stop motion company as well as a VFX House.

So Yeah, all in all a good day!
 

Tuesday 9 October 2012

Visual Effects vs. Special Effects


Special effects- usually preformed on set during production. This is broken down into 2 more categories; Optical effects and Mechanical effects.
Visual effects- Usually added in post-production. It is rare to see a film without Visual effects, this can be from filling a green screen to adding CGI in post-production.
Although both teams are involved during the shoot and post production, each creative decision is given to whomever's field is more appropriate during the production pipeline.
Optical effects: (a division of Special effects) this is where the camera or lighting is used to convey a certain message/mood on screen which is not what it would look like to the naked eye. A good example of this is the dolly zoom, shown here in a scene from Jaws 1975.

Mechanical effects: (a division of Special effects) these are also created during a live-action shot and are usually designed to making things look like something they are not. This can range from manipulating weather and wind to pyrotechnics and full scale models. Some examples are shown here by Technifex.


Special effects supervisor- will make the creative decisions and work closely with the director on set to achieve the results he/she wants.
Visual effects supervisor- will make all the creative decisions and work closely with the director on and off set to make sure he/she gets the desired visual image.
Visual effects coordinator- will work for the visual effects supervisor in post-production.
Visual effects producer- deals with the cost of the visual effects.

Friday 5 October 2012

From Video Pixels to Multi-pass CGI compositing


[I SHALL REVISIT THIS SPACE AFTER I HAVE SHOT MY GREEN SCREEN PLATES AND PUT IN IMAGES TO SHOW MY WORKFLOW]

Video pixels are naturally separated into Luminescence and Chrominance. A Luma matte looks at the brightness of the pixel whereas Chroma matte looks at the colour.
Luma keying views the image as grey-scale and sets a threshold value for each pixel, equal to or greater than 100% white, and the rest are black (empty space). It is possible to separate out RGB channels and create a Luma matte for each value which can then be composited together to create a matte to key out backgrounds that are difficult to key with the original image. You would effectively be using the brightness in e.g. 50% red channel matte, 30 % blue channel matte and 10% red channel matte. This can be used to create a hard contrast matte which would have strong edges but a soft interior. And the threshold can be altered to create the opposite; the 2 mattes can then be composited together to create the Ulitmatte.

Garbage matte- a rough/quick matte.

Chroma Keying looks at RGB, hue, saturation and value (brightness). Looking at all this could create softer edges automatically. If one matte does not work it is a good idea to over lay a few Chroma key mattes with different thresholds and max them together. You could also raise the amount of green as oppose to Red and Blue and use this for a cleaner matte.
To remove grain from the plate (Green/Blue screen shot) effectively, remove grain from either the green or blue channel. Most of the grain noise comes from the blue channel and majority of the image detail is held in the red and green channels.

Over exposed or hotspots on the green screen?- lower the brightness to pull the matte.
Under exposed, too dark?- raise the brightness to pull the matte.

Despill- the removal of baking colour spill contaminating a foreground shot, e.g. Chroma Keying hair. Fix this by a hue shift or brightness drop on one of the RGB channels.
Spill Map- a monochrome image that contains excess green from the Green screen plate. Subtracting this from the plate will give a despilled image. Clipping the green channel is another method, by keeping the green lower than the red channel, but all methods are really just creating a series of spill maps.

The Composite= (Green Screen x Matte = scaled foreground) + (Background x Inverted Matte = scaled background).

Compositing this way makes a cleaner edge blend. Blending the two images into one is like punching a hole in the background and filling it with the foreground.

Alpha channel- matte rendered with a 4 channel CGI image for compositing.
Key- matte rendered to composite 2 video layers.
Both the above are for the same purpose but with different names.

Mix composite- Add mix method gives edges more intensity or removes dark edges around the foreground. This is done by adding a colour curve to the BG and FG mattes before using them in the composite.
Edge blend- use the two mattes to create an edge outline of the FG and blur from 1-3 pixels, then add this over the final composite.
Light wrap- blur the FG matte, invert, multiply by the origional matte and then multiply by BG to create a Light wrap.

Soft/Hard comp:
1. Create a soft matte with edge detail but bad density in the middle.
2. Multiply soft matte over BG to create soft comp.
3. Hard matte is a tight matte from FG with good middle density.
4. Add one matte over the other to create the hard comp.

Layer integration- selling the shot by integrating items from similar BG's to put into the image, creating depth and then colour correcting to make the shot look seamless.
CGI compositing:

Premultiplied- all passes rendered into one, unable to edit highlights/flares without editing the rest of the image especially in 8 and 16-bit channels because the RGB values exceed the alpha values. Colour correcting here will cause dark edges, this is fine for small (far away) images.

Unpremultiplied- Different passes of the same render. Rendering highlights on a separate pass stops highlight clipping (dead white spots). Easier to colour correct only the colour pass, without effecting shadows or highlights.

Render layer- rendering multiple CGI objects on separate layers can be more cost/time effective than having 1 CGI layer, because if a problem arises, only one part has to be re rendered.
Render pass- different surface attributes of a CGI object, when combined in a composition they create an editable object.
Beauty pass-(colour pass or diffuse pass)- a full colour pass of the object with coloured texture maps and lighting, normally no shadows, highlights or reflection.
Specular pass- (highlight pass)- this has highlights/special effects. Typically screened or added to final composite.
Reflection pass- all reflections! Typically screened or added,
Occlusion pass- (ambient occlusion)- all white version of the object with dark corners/cracks. Typically multiplied by colour pass.
Shadow pass- often rendered as a monochrome image to act as a tint over a colour pass.
Alpha pass- (matte)- one channel image. White over black.
Light pass- rendering lights in separate passes allows for more control by the compositor to match the live action lighting.
Data pass- creates depth of field, e.g. gradual blur by using a mask that fades from white to black.
Matte pass- used to isolate particular parts of the CGI image which can be edited by the compositor. 4 channels can be put in each pass, RGB and alpha.

Multi Chanel Files- previously 3D departments would use TIFF files, which were a series of different passes. Then along came EXR files, which is one image holding multiple passes like layers in Photoshop. This makes it perfect for Multi-pass CGI compositing.

Wednesday 3 October 2012

Camera Skills Workshop


I attended a camera skills workshop today and learned some really nifty things:

DSLR Camera- shallow depth of field. when a focus point is established, anything closer or further away from that object will be out of focus. cinematic feel. if you zoom in/out it becomes out of focus, you can digitally zoom out.
Focus- a unit of length.
Focus pulling- taking focus from one object to another, use tape to make two marks on the camera, when actor hits his mark on the floor you can change exact from one focus mark to the other.
Exposure- how much light you let into the camera lens. makesure you try and get all the information on screen.
Camera- is a box for collecting light, just like your eye
Aperture- the hole/iris which lets light into the eye or camera, can be made bigger or smaller to balance the amount of light in scene.
Light (going int a camera)- 100 is white and 0 is black, the camera can not see above or below this.
Over Exposed- unable to see detail in subject because of excess light. This is seen in alot of Celine Dion music videos when they light her face.


Zebra stripes- A function on a handy cam which shows black and white stripes behind the image to show the area where white is overexposed (it has too much light). Lowering the aperture allows less light in and gets rid of the Zebra stripes. But it is better to make the original key light on the subject less harsh by bouncing it off a white object.
F stops- measurement of exposure the higher the number, the darker the image. F stops are like sheets of glass in front of the lens, the more sheets you add the harder it is for light to get into the camera.
ISO- finds colour in dark areas, but it brings in noise as the camera guesses what colour the pixels are.
Shutter speed- just like an eye the more you blink the less light goes in but the image is clear, if you keep your eye open, more light goes in but it starts to get blurry  The opening of 'Saving Private Ryan' was shot on high shutter speed for that action feel. Do not be tempted to add light via shutter speed because the image will become blurry. 24fps = 48 shutter speed  (roughly double your fps).


Rolling Shutter- when the camera can not keep up with the moving image and so it leaves distorted limbs of an actor in places.
Under Expose-unable to see detail in subject because there is not enough light.
White balance- white contains all the colours, so you zoom into something white and press Auto White Balance. This allows flesh tones to match reality. If you zoom in on green it will make the flesh colours pinky-magenta because that is the opposite colour on the colour wheel, and the camera uses this to counter balance  the image as it thinks green is white. This style can be used to make a warm day look cold or vice versa. 
Tungsten- a metal in filament light bulbs, tungsten light is red (glows yellow-orange) .
Florescent lights- glow yellow/green.
Sunlight- blue light.
Every time the lighting changes you need to re-white balance.

The following are  options found on a DSLR camera:
Auto WB- camera chooses white balance for you (never use this).
Day light- camera adds red.
Shade- will add even more red, sun is blue but scene is darker.
Cloudy- camera will add a small amount of red.
Tungsten- camera will add blue, but may not look correct.
Flash- not used in moving image.
Colour Temp.- manually able to adjust this from very hot (red) to very cold (blue).

Making an image look 3D on screen?- use shadow, a cardboard cutout creates 1 shadow  but we create lots of shadows which shows depth. if the light is square on then we look flat, but if the light is bounced in from the back (back light). This can be used as a key light, adding a weaker light or a fill light adds depth and more shadows. Reflectors are useful when filming outside, not much light bounces off but it makes a difference. Black side of reflectors deflects light away, lens flares etc.


Tuesday 2 October 2012

Shatter/ Fracture Test


For this project I'm looking to create realistic looking 3D objects in Maya which I can then composite in After Effects to make some sweet looking effects. I started off by looking for a plugin for Maya which would  create the fracture simulation for me and I found PullDownIt. I've seen some amazing things online using this plugin but the limited/free version is very hard to install and according to a few online forums it doesn't work with Maya 2012. 

I finally gave up trying to get it and decided to fix a technological issue with creativity, turns out Maya already has a shatter simulation, but it only seems to create equal sized pieces, so I over came that by hiding a small ball, also with a shatter effect added to it within the pipe object in my scene. This made the simulation seem a bit more realistic, and I can go another step down by placing an even smaller object inside if I need to create even smaller particles. The next thing I intend to do is to create one object colliding with another.

My final idea is to have a a bullet fly into a mantelpiece clock, a shard of which flies out into the camera.